SuiteCRM is an excellent open-source CRM application. In another tutorial, I explain how to install SuiteCRM in a Docker to host your own CRM.
In this post, I provide an example of customizing SuiteCRM by adding a custom action to a menu in the application – either the module menu (in the left sidebar) or the actions menu (above the detailed record in each module).
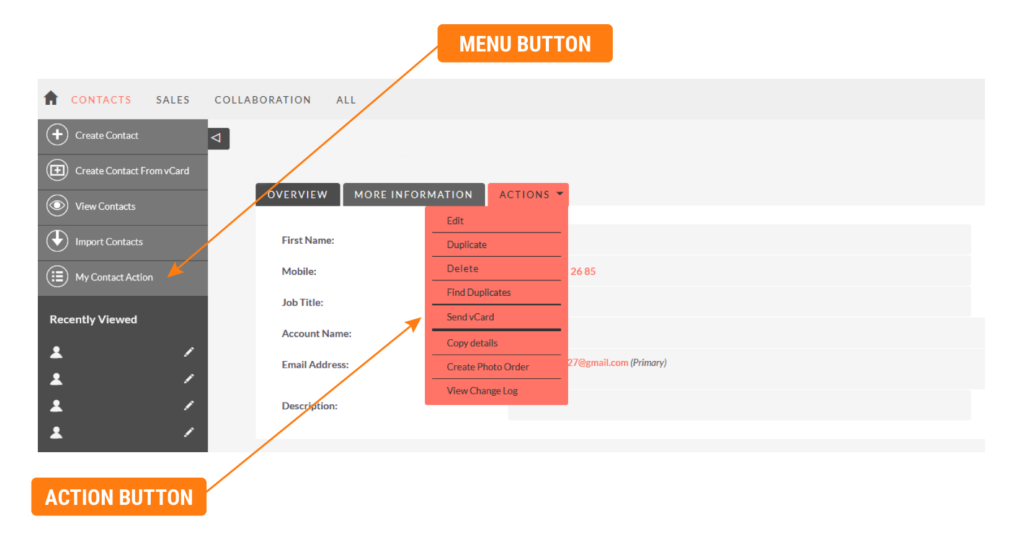
You can see these options in the illustration below:
- Menu Button for a button in the menu.
- Action Button for a button in the actions menu.

For each of these buttons, the action can either call a SuiteCRM Entry Point through a direct link or trigger an action through a JavaScript function. I have chosen the latter, and I explain in another article how to add this JavaScript function.
Menu Button
I will add a button that appears for the entire “Contacts” module. When clicked, it executes the JavaScript script tmcWebhook() with the specified parameters.
custom/Extension/modules/Contacts/Ext/Menus/tmcMenuButton.php
<?php

// variables we want to access in the script below
global $current_user, $mod_strings, $app_strings;

if (ACLController::checkAccess('Contacts', 'view')) {
    $module_menu[] = array(

        // button link
        "javascript:tmcWebhook('tmcSG','{$current_user->id}','','getLeadsExcel');",

        // button label
        "My Contact Action",

        // button icon
        "List_Maps",

        // module
        "Contacts"
    );
}
Once this file is created, you need to run “Quick Repair and Rebuild” in the admin panel to apply the changes.
Action Button
In this case, you need to modify the detailviewdefs.php file in the custom directory of the chosen module.
If this file does not exist, it can be created simply by going to Studio and saving the detailed view in the chosen module (in this case, the Contacts module).
custom/modules/Contacts/metadata/detailviewdefs.php
<?php
$viewdefs ['Contacts'] =
array (
  'DetailView' =>
  array (
    'templateMeta' =>
    array (
      'form' =>
      array (
        'buttons' =>
        array (

          // ...
		  // other buttons
		  // ...

          6 =>
          array (
            'customCode' => '<input type="button" class="button"
          value="Send vCard"
          onclick="tmcWebhook(\'server\',\'{$current_user->id}\',\'{$bean->id}\',\'sendvCard\')" />',
          ),

          // ...
		  // other buttons
		  // ...

        ),

// ...
// rest of code
// ...
Again, once this file is modified, you need to run “Quick Repair and Rebuild” in the admin panel to apply the changes.
Reminder: In both examples above, the JavaScript code tmcWebhook() can only execute if it is loaded beforehand. See this article for a possibility.
Conclusion
Implementing custom buttons opens up numerous possibilities for performing repetitive actions and allows you to better leverage the power of SuiteCRM.
Good CRM!


